Exposure
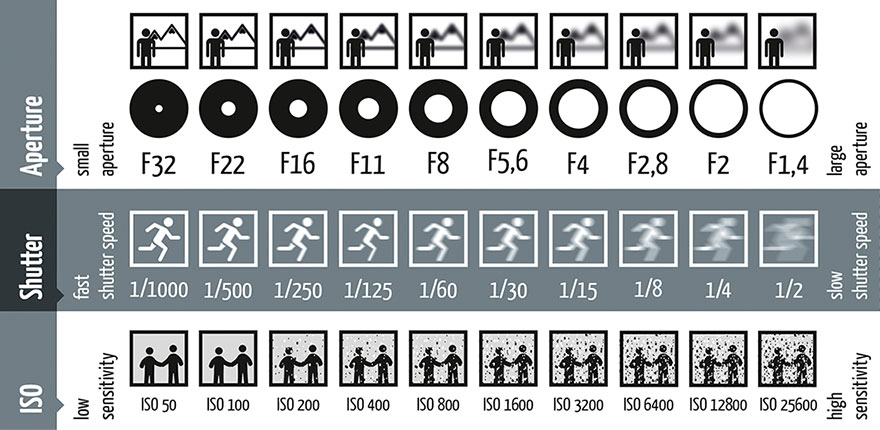
This week we learned about the exposure triangle which consists of the ISO, aperture and shutter speed. It is placed in a triangle because as soon as you change one element, you need to compromise it with another.
The Exposure Triangle
ISO is the sensitivity to light and is a bit like a pair of sunglasses, this affects the graininess of an image.
As you can see, in the picture with an ISO of 3200, the picture turns extremely grainy as compared to the picture with ISO 100. I think the best ISO value, in this case, is 800 because it has good lighting and isn't too grainy.
Aperture is the size of the hole which lets light through and is a bit like a window, this affects the depth of field
From these two pictures, we can see that with a high aperture (f2.8), the background is blurred, the focus point is high and the depth of field is shallow. With a high aperture, our focus is turned to the first peg instead of the background. In the second picture that has a small aperture (f16), the background is clear, the focus point is equal and the depth of field is deep. We can use this photo below to help us:
Shutter speed is how long the camera sensor lets light in and is a bit like a curtain, this affects the sharpness of a photo. This is mostly used to capture moments that happen really quickly like jumping into a puddle, jumping down the stairs etc. and is mostly used in sports photography.
In this photo, we can see that with a slow shutter speed, our camera is unable to focus on a fast-moving object like a windmill. As the shutter speed increases, it freezes actions and allows the camera to focus on the windmill very clearly.
Finally, here's a photo that summarises everything I have learnt today about exposure.

Frame Rate
The frame rate is the number of individual frames taken at every second of the video. The most common frame rates for video recording are around 30 frames per second. A higher frame rate means that the video is smoother whilst a lower frame rate means that the video is more jerky.
Many people cannot differentiate between frame rate and shutter speed- they think that the shutter speed is the frame rate. For example, if your shutter speed is 1/200th of a second, they think that they are taking 200 frames per second. This concept is wrong.
Shutter speed is how long you are exposing each frame to light per individual frame
Frame rate is how many individual frames you are taking per second of the video
A good way to remember how to adjust your shutter speed according to your frame rate is that the shutter speed should generally be double the number of frames per second. For example, if you are recording at 30 frames per second, you would adjust your shutter speed to be about 1/60th of a second. However, you do not have to do this at all times because by playing around with the shutter speed, you can achieve varying effects.
Cinema FV5
Cinema FV5 is the name of the Android app we will be using to practice filming and possibly also use to film. I watched a video linked here: https://www.youtube.com/watch?v=K1FfucjbgmU to help me learn how to use this app. Here are some screenshots I took whilst watching the video to help guide me in the future.
This is what the start screen looks like
This is what happens when you click record- on the top left corner, there is a bar showing whether or not it is picking up audio and on the right, it shows how long it has been filming for.
Some settings that need to be ticked for the best recording quality:
Use camera compatibility
Lock exposure during recording; lock white balance during recording
Choosing the correct audio source
Checking the audio settings- set it as follows
You can choose different display modes- for example, the grid for the rule of thirds
You can choose the white balance- choose auto
You can choose the focus- choose the one where you can click on the screen to focus


No comments:
Post a Comment